Showing posts with label project. Show all posts

Sunday, February 16, 2020

Up-cycle an old File box into a writers box


Project

Up-cycle an old File box into a writers box. Perfect project for  the Paper Addict.


You've seen these before

First I cleared out all the files and hardware inside the box.

Then I glued some decorative paper to the lid backing, and glued some Leather organizer pockets that I'd removed from an old brief case.

A couple of pieces of leather strap hold the lid in an upright position so it won't fall all the way back. 
Room for everything

 and it's portable.


Tuesday, May 23, 2017

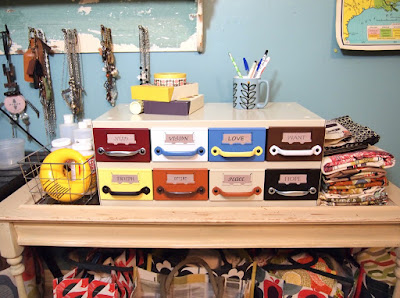
Upcycled, organization with quirky style

Hubby surprised me with this one. He's always interested in these multi drawer metal cabinets when I find them. I picked this one up for him at a recent estate sale. Wish I had a before pic, but I don't .

Anywhoo...He surprised me with it's makeover. Hope you like it.

Here's his process in a nutshell. He need to buy  2 handles from Home Depot and spray paint. He cleaned Cleaned, sanded with scotch bright pads, and painted, and then found some fonts of various inspirational words, printed them and Voila!
I love his color choices.  Good Job Honey!

Saturday, February 25, 2017

Turn an old leather bag into a backpack without damaging the bag

For this project I used an old Leather Coach Willis Bag, but any bag with top rings will work.
 
My bag was missing it's crossbody strap. With this alteration technique it can be worn as either a crossbody (above) , or a backpack (below).
 
 I attached a jump ring, in a rectangle shape to the bottom of the bag.  You'll need a piece of scrap leather and a rivet.  I got the jump ring from another old bag, Re-purpose as much as you can on this project
 At the bottom I'll have a supplies resource list. 
I inserted the hole needed for the rivet through and between the stitches at the bottom of the bag. The rivet can be removed later if desired, and the bag will return to it's prior condition.  I used an awl to coax the stitches apart just enough to insert the rivet shaft. (you could also use a small screwdriver to coax the stitches apart).
 I used a couple of old belts (again re-purposing)  to make a long strap that can be separated using  head button studs to fit it to the size you desire.  I placed the studs 2" apart on one belt and punched holes 2" apart on the other. 


I attached the straps to the top rings with rivets, this could also be done with the Ball Studs to make it fully detachable.

You'll need some specialized equipment to do this.  Here are links to the items used via
Leather scraps, jump rings, belts, all found or thrifted.

Friday, November 18, 2016

Mail Box Organizer Project, Mud room organizer, Keys and such


 This project is something I've been wanting to do for awhile now.  It's fairly simple but did require a few tools.


The mail box I used did not have the hooks below that a lot of old mail boxes have. If it did, those hooks might have been all that was needed and you could have just hung the box up and been done with it. 

 But my hubby has several cars (classic) and several sets of keys, so having up to 6 hooks is a bonus.  I cut a piece of wood so that it would fit in the bottom of the mail box.  I then drilled 3 holes and screwed in my double hooks. That is all that was needed.  

For added interest and functionality , you could paint the mail box and or add vertical wood pieces to make compartments inside. 
Just one of my projects designed to bring some organization to my mud room.

Brand new issue of Flea Market Style Magazine
Now available for Immediate Shipping.
get it before it even hits the stores.

*************************************************

 An All New Never-Before-Seen 
2016 - 2017
 issue of
Flea Market Style Magazine.
 
Click photo or here for ordering information

Saturday, November 12, 2016

No need for a Vase when you have a Thermos

 
Even though it's fall, I still have a few Lantana's blooming.

 
 No need for fancy vases, and old Thermos does the job.

Brand new issue of Flea Market Style Magazine
Now available for Immediate Shipping.
get it before it even hits the stores.
 

 An All New Never-Before-Seen 


Click photo or here for ordering information


Orders will be shipped within 2 working days and will come right to your door, no driving around waiting for them to show up in the stores.

Save time, frustration and gas.

Also available are a selection of back-issues.  

Click the social media links below for more updates
@fleamarketstyle on instagram
Flea Market Style Magazine on Facebook

Sunday, February 28, 2016

Fun project, Family Message Board


Thomas Edison said "To invent, you need a good imagination and a pile of junk"
Well I definitely have the pile of junk, So here's my project.  

Take that pile of junk. Grab anything and everything that might be used to make a family message organization center and start building.
To invent, you need a good imagination and a pile of junk.
Read more at: http://www.brainyquote.com/quotes/quotes/t/thomasaed125362.html
To invent, you need a good imagination and a pile of junk.
Read more at: http://www.brainyquote.com/quotes/quotes/t/thomasaed125362.html
To invent, you need a good imagination and a pile of junk.
Read more at: http://www.brainyquote.com/quotes/quotes/t/thomasaed125362.html
 
 You'll need lots of screws, and a drill and some glue.

Some things you'll need for a family message board are,  A place for magnets to stick to, a chalk board, clips for messages, hooks for keys or whatnot, some sort of container to keep supplies, and a place for a replaceable pad of paper. I'm sure there are more things that could be used, but with that formula here's what I made.

 Clock is the magnet board above, and the metal soap dish piece is the magnet board below.
For chalk tray I used a scrabble tile holder above and a piece of a picture frame below.

 Back board for this is an old ammo crate lid, I kept the hinges and they become the hangers to attach it to the wall.

 This one below is  a bit different. The backing is an old tray, I simply glued the chalk board and chalk holder to it leaving enough exposed on the sides for magnets to be used. Then I added one clip to the front and more if needed can be added at the fluted sides.  This cleans up the refrigerator chaos a little bit.
 If you don't want to build one of your own, two of these are available in my Etsy store here


Monday, February 8, 2016

Projects, Painting, Goodies, and Grandson

This week on Instagram. If you are not following along, you are missing out on the Fun. This week I featured some quick projects, a bedroom makeover painting project, some funky shelf paper spotted at a local Estate Sale A cute photo of my Grand-son and Grand-dog and much more.  So click the link above and follow me on Instagram.


Monday, January 18, 2016

Getting Organized in the New Year with your junking finds

If you don't follow me on Instagram or Facebook you are missing out on most of my posts and ideas. So I thought I'd take a moment to catch you up.

 Every day this month, I'm posting ideas of how to use your fabulous junking finds to get organized in 2016.

 For the home office


 I love taking everyday objects and junk finds and giving them a new purpose. Many  old objects can be creatively used in your home or office to keep you organized, in a fun and interesting way.

Hop over to my Instagram or Facebook page for more ideas daily.
 Link at top of blog

In the Garden, Kitchen or Fireside

 For the studio or craft room

Even in the bathroom

Put your junk to work in 2016

Tuesday, December 22, 2015

One more Christmas Project

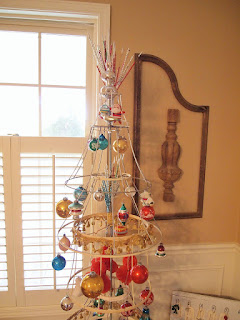
While flipping through an old issue of Flea Market Style magazine I ran across this picture of some old picture frame molds, and it looked like a Christmas tree to me. So I decided to make my own out of some old frames.


I'm happy with the look and it was a pretty quick project.

Hope you are ready for a very Merry Christmas

Saturday, December 5, 2015

Lamp shade Christmas Tree, Christmas outside the Box


And now for This year's Tree
Made from old lamp shades, Inspired by Pinterest (of course)

 First an assortment of lamp shades from garage sales, and goodwill.


First I skinned them
Then I mounted them to a threaded rod with bolts I purchased both at the hardware store,
and mounted it to a base(this part took the longest)


Now for embellishments. Juno wanted in on the action.

A few shades get some gold trim from my stash

A large stash of vintage ornaments is helpful, and you'll need hooks.

This project could be as small or large as you want, based on size and quantity of lamp shades.
I'm still unsure about the paper bells, but it does give it some dimension


 An old Wool  blanket below.

There is even a version of this idea with covered lamp shades. See my pinterest page

There you have it, My completely vintage Christmas tree made from old lamp shades.
I think this will be a one year tree, because next year I'll have a 1 year old grandchild and this would tip over real easy.  I may make a table top version though.

Friday, December 4, 2015

Alternative Christmas Trees, a Tradition

A few years ago I decided I was going to retire the "traditional" Christmas tree for awhile . My boys are grown and moved out and
the tree is the hardest part for me, First there is the hauling it down, then putting it up and stringing lights. By that time my family has pooped out and abandoned me. Not to mention the putting it away 4 weeks later.

With that in mind, I put up a vintage aluminum tree for a couple of years. These go up real easy and there are no lights to string


Then I went way outside the "box".   with  this small tree from old spindles


As an accent I made this one from a single spindle and some wire. I still bring it out every year. It's a good accent decoration
 
Then I went to Pinterest and got loads of inspiration

 For the last 2 years, I have this one I made with an old screen and lots of vintage glass ornaments. At the end of the season, I wrap it up in an old sheet and just take it to the attic. I'll probably bring it down this season too. Inspired by this original project at Sointovintage.blogspot.com

 
 But when I saw this idea on Pinterest by lucydesignsonline.com I just had to try it.  Vintage frames make up this fun, but heavy accent tree. 


Wait till you see what I have cooked up for my main tree this year.


To see the complete list with links, go to my pinterest page.


Blog Widget by LinkWithin